The article ‘Step Plan Tolerance Analysis‘, briefly summarizes the steps to achieving a good tolerance analysis. The following articles discuss the method of adding tolerances. Much attention has been paid to the Statistics of Dimensional Variations of manufactured parts and how to deal with them. Tolerance analysis with Cpk requirements was also discussed. An important and often difficult part was covered very briefly: setting up the tolerance chain.
Drafting the tolerance chain
Establishing the tolerance chain is often considered one of the most difficult parts of tolerance analysis. Especially with complex, three-dimensional structures, it can be difficult to see and describe the actual “path” of the tolerance chain. And you need that chain to identify all the parts that are important in the analysis. Mechanical (or software) adjustments/calibrations in the assembly process can also complicate the analysis.
An example will be used to discuss setting up the chain, and tips & tricks will be given.
Without a ‘critical dimension’ no tolerance chain
Without a critical dimension, you can’t build a tolerance chain. But what is this critical dimension? In short, it is a specification. And it is the specification of which you want to determine the influence of tolerances. Step 1 in your tolerance analysis is to determine that specification/critical dimension.
The specification can be anything. Sometimes the specification is accuracy: think of the imaging chip in a (digital) camera relative to the lens (or lens system). Other times it is a question of whether something fits or not. Or the question of whether a slide or (linear) motor has enough range. Or, for example, in an assembly with rotating parts, whether the runout is not too large.
Sometimes there is only one critical dimension in the assembly, but often there are several. Each critical dimension has its own chain of tolerances. And its own tolerance analysis.
Different machine states
Step 2 in your analysis is to describe in which (machine) state (or condition) the specification applies. Sometimes there is a different specification for the state before an adjustment and after an adjustment. Or there are different states of use (pressure, temperature, motion, forces, et cetera). For example, consider a robot whose position is calibrated at low speed, but will operate at high speed.
Make a simplified sketch of the assembly
Step 3. Once you have a clear definition of the critical dimension, make a simple sketch of the structure. If you start with your assembly drawing in CAD, it may be so complex that you can’t see the forest for the trees. Ideally, make your sketch in something like PowerPoint so that you can explain the design to anyone who is interested. What matters is the essence of the assembly.
Once you have that sketch, you (hopefully) have all the parts that go into your chain. Then the puzzle of finding the right chain begins. This can sometimes be quite complicated. Keep the goal in mind: you want to make a proper (correct) tolerance chain, and you don’t want to take too long. How you get the chain is not really important. Any method is acceptable.
Here is a simple sketch of a design where the rubber gasket should be mounted at a prescribed pressure. In this (first) design, the nut is tightened until the nut rests against the larger diameter part of the bolt.
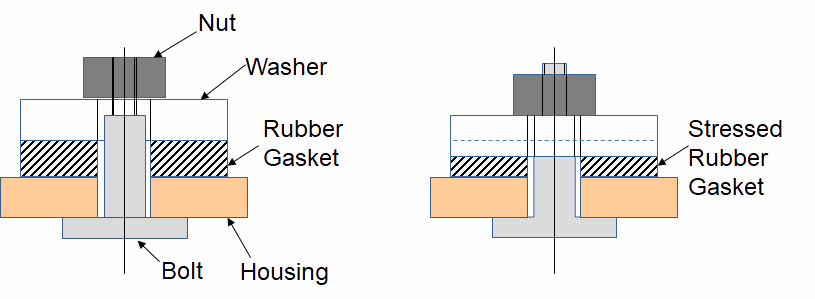
Now you can draw the critical dimension in the sketch. Since the pressure on the gasket is specified, this pressure is your specification and therefore your critical dimension. Your analysis is then, of course, to evaluate the effect of part tolerances on the gasket pressure. The selected design provides a nominal indentation, and tolerances cause a variation in that indentation. You can then use the properties of the gasket material to calculate the pressure.
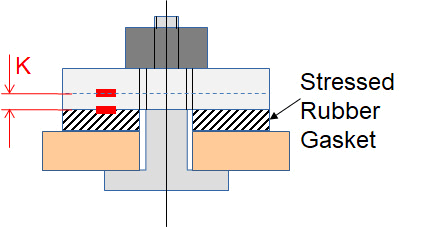
The critical dimension K in your sketch then looks like this:
There is only one dimension per part in the chain
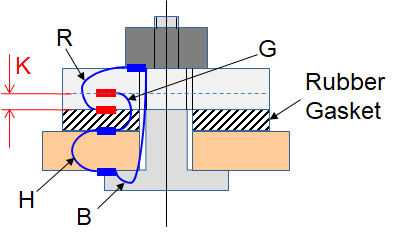
Now that you have the critical dimension, step 4 is to create the chain, the “path” through the assembly. This is not too difficult in this example. Each part in your tolerance chain always has two interfaces. And between those two interfaces you can draw a dimension line (hopefully it’s already there) with a corresponding tolerance.
Often you start at either end of the critical dimension/specification and figure out which dimension in the part affects your critical dimension (specification). That dimension doesn’t necessarily have to be on a drawing (but hopefully it is). And that dimension must interface with a subsequent part in your tolerance chain.
In this example, it will be clear that the following parts have an impact:
- thickness of the (unstressed) gasket;
- thickness of washer;
- length of bolt;
- thickness of the housing.
Tolerance chain is always closed
A proper tolerance chain is always closed. That is, there is a unique path from “one side” of the specification to “the other side” of the specification. If multiple routes are possible, then the structure is overly constrained or something is wrong with your chain.
If there is a gap in your tolerance chain, one or more parts are missing. Sometimes it may appear that there is a gap in your chain because the parts are not in contact. However, the chain may still be closed because there is a mechanism that determines the size of that gap. For example, consider the air gap of an air bearing.
The following figure shows the entire chain. The important part dimensions are coded:
- P = thickness of the (unstressed) gasket;
- R = thickness of the washer;
- B = length of the bolt;
- H = thickness of the housing.
Additional Contributions
Step 5 is to add contributions that you won’t find directly on the drawings, but that affect the critical dimension. For example:
- Vibrations. For example, the vibrations of a robotic arm;
- Temperature effects such as expansion;
- Deformations due to forces or the passage of time (for example in the case of plastics).
The rule is that anything that affects the critical dimension must eventually end up in your tolerance table.
Create the Tolerance Table
The only thing left to do, in step 6, is to fill in a table with the nominal dimensions and the corresponding tolerances. And then add it all up. The TolStackUp spreadsheet is a good tool for this. All the formulas are already there, so you can quickly see the statistical sums.